Northern lights observation guide
Preamble
This guide is the fruit of my nights spent under the northern lights. I hope that it is complete enough and that it will give you answers to the questions you will ask yourself to prepare your trip…
Also I suggest you to read this article first: “Understanding the northern lights”.
Where?
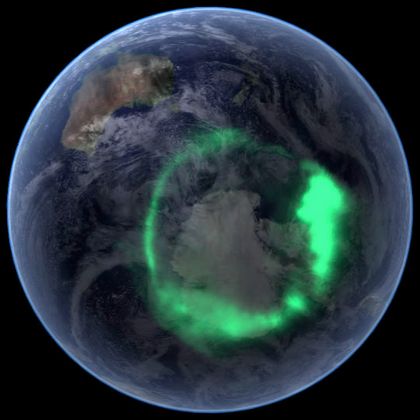
Auroral ovals
Seen from space, northern lights take the form of ovals centered around terrestrial magnetic poles. They are 500 to 1000 kilometers wide. During an average activity (the most common), the ovals form around a latitude between 60° and 70° north.
If the activity is stronger, their diameters increase and they go down more to the south. Therefore :
- During strong activity, an observer who is too far north will see the aurora on the southern horizon.
- During normal activity, an observer located too far south will see the aurora on the northern horizon.
Where to travel?
During moderate activity, all regions below the auroral oval are ideal (60° - 70° north approximately):
- Northern Norway (Tromsø region).
- Lapland.
- Iceland.
- Siberia.
- Canada, Alaska.
Norway, Lapland or Iceland?
It all depends on the purpose of your trip:
- Northern Norway and Lapland (Swedish or Finnish) are the most suitable regions for observing intense and “normal” auroras. In Tromsø region, which is located 5° further north than Iceland, you will see a normal activity aurora at the zenith. Which is already very spectacular. The climate there is also very mild for the latitude. As long as you stay close to the coasts, temperatures above 0° are common. Be careful in Lapland, the temperatures can blithely go down below -30°: get out well covered… (see “Personal equipment”).
- Iceland is further south than Norway: normal auroral activity will not be observed at the zenith, where it is spectacular. It will be a bit lower on the northern horizon. However, due to the island’s great volcanic past (and present), the landscapes are breathtaking. However, be careful with the climate: it is rougher than Norway (wind).
One last thing to consider: Iceland has become very, very busy in recent years (the country is increasingly subject to a touristic overload, the authorities are working on the problem). Choose distant places north of the country to be quiet.
When?
Period of the year
I will only consider Scandinavia because it is the region that I know the best. There, the northern lights season begins end of September and finishes at the end of March.
- October is a good month to go: the number of clear nights (cloudless) is the most important of the year. On the other hand, you will not yet benefit from the snow-covered scenery that makes the region so charming.
- Avoid the month of December: it is the polar night (but during the day, it is not so dark, it is like dusk).
- For a photographer, the month of January is interesting: days are getting longer, the Sun is rising on the horizon and hugs him for hours. The lights are incredible, but the days remain very short.
- The February-March months are a good compromise between lights, sunshine, dawn, climatic conditions and winter scenery.
- The two months of the equinoxes (September and March) are the most favorable to see powerful auroras due to numerous faults in the Earth’s magnetosphere (the Russel – McPherron phenomenon).
The Moon
Prefer nights without Moon to enjoy auroras. A slight crescent, however, can be useful for photographers: it will reveal the landscapes on your photos. My favorite nights are the one around the week of the new Moon.
The maximum of the solar cycle has passed. Can I hope to see northern lights this winter?
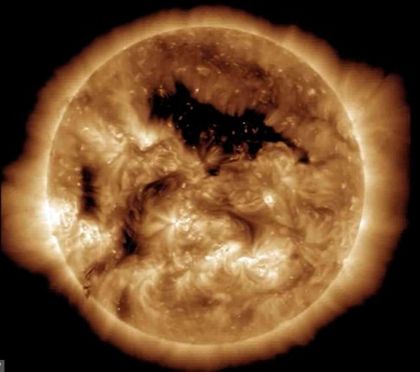
Yes! The solar cycle is only related to the number of spots that appear on the surface of the Sun, which reaches its maximum every 11 years or so.
However, contrary to popular belief, the spots are not the the only solar events to be at the origin of northern lights. There are also the coronal holes (see the article “Understanding the northern lights”). The formation of these holes is independent of the solar cycle and they appear very regularly on the surface of the Sun.
At what time of the day?
It is pointless to choose a period of polar night to have a better chance to see northern lights. The explanation is that the Earth revolves around its geographic north pole while the auroral oval is centered around the north magnetic pole (the 2 poles are separated by approximately 8°). Consequently, all the favorable observation regions are not always located under the auroral oval.
The following animation helps us understand the phenomenon (source: K. Akasofu - Asahi aurora classroom):
We can see that the pink point in Alaska enters the auroral oval around 8 p.m. and get out of it around 4 a.m. The times will be the same whatever the country you are in: the auroral oval remains static, it does not revolve around the magnetic north pole. Therefore, be ready from 8 p.m. in the evening: this is the entrance time under the auroral oval.
Also, do not go to bed before midnight: you will be in the heart of the most active region of the oval. Even though the aurora can happen quite early in the evening, force yourself to eat well to hold all night in case of intense show.
Personal equipment
Watching the aurora is a static activity: we don’t move a lot during several hours. You will not enjoy the show if you are cold too quickly.
Body
A good ski equipment is enough. In case of intense cold, you will multiply the layers: ski underwear, various fleeces, hot ski pants…
Extremities
Invest to cover the extremities of your body, this is where the greatest heat loss happens.
- Head: invest in a big beanie or a chapka.
- Hands: protected by a pair of warm mittens, or ski gloves covered with over-gloves in which you will put a heater. You can also take under gloves: they will protect you from the cold when you take off your gloves to handle your camera.
- Feet: this is where you will feel the cold invade you. Avoid summer hike shoes: they are not hot enough and they will not protect you against the very cold snow moisture. Invest instead in a good pair of après-ski, or better, in a pair of Sorel Caribou.
Other accessories
Always carry with you a pair of crampons (sold for ten euros in supermarkets): they will avoid you slips and bad falls if there is ice on the ground (or if it is hidden under the snow).
Take a few heaters (hands and feet above all). Avoid rechargeable heaters in water boiling. You will forget to recharge them and they are few comfortable (they are very hard). Disposable models will do just fine.
Finally, do not forget a headlamp. Choose one with red lighting to keep your night vision and not dazzle your observation mates.
Wheather forecast
Northern lights is a high altitude phenomenon, which occurs well beyond the clouds (from 70 kilometers altitude). Therefore, you have to watch for the weather forecast as much as the solar storm forecast.
But do not despair if an evening starts under the clouds while the solar storm forecast is good: the weather can change quickly on the Norwegian coast. So watch the satellites animations to see if cloudy gaps are heading towards you (see the links at the end of the article).
Travel and traffic conditions
Before moving, watch over:
- The weather: anticipate complicated conditions: snowstorm, strong wind…
- Traffic conditions (see useful links later in this article). Remember, you are in the arctic.
This is especially true in Iceland:
- The roads indicated by your GPS (Google Maps and others…) can be rutted paths for many kilometers, without telephone coverage. In the event of a weather problem you can quickly be in trouble. Take a critical look at the route suggested by your GPS and favor the main roads.
- In addition to snowstorms, pay close attention to sandstorms in the south of the country.
When you arrive there, plan to buy a snow shovel (about fifteen euros) in an auto center, it can to be of great service to you and to get you out of a difficult situation. Consider also to buy a tow rope.
Finally, never take a risk and avoid snowy road verges, they are very soft: you can make your car fall there. Think about it if you have to do a U-turn.
Spotting and where to look?
You will have to get away from cities and their light pollution.
Auroras will appear on the northern horizon, from west to east, or at the zenith. So make sure at least some of these horizons are far away from any major city.
Be more demanding during spotting if you plan to take quality photos: see article Photographing the northern lights.
During the night…
Stay alert from approximately 7 p.m. until at least midnight (an important activity can occur at this time: you will be at the heart of the auroral oval, see above).
There will be several shockwaves: the aurora will lose its activity, then will get back some. Tell you that the auroras are capricious: you just have to want to go to bed because there is no more activity so that the auroras wakes up… Also, in case of strong solar storm, it may happen that the aurora is visible while the Sun has just set (it may still be daylight), until very late at night. One time I observed an aurora at dawn in Iceland around 5.30 p.m. which ended around 5 a.m.!
If the cold hits you, take a break to warm up during low auroral activity: have a hot drink, get moving, put your hands under your armpits.
Northern lights forecast
Principle
It all starts with observing the Sun. It is constantly scrutinized by satellites like SDO (Solar Dynamics Observatory) and STEREO (Solar TErrestrial RElations Observatory) :
- SDO is responsible for monitoring the Sun. One of its missions is to take pictures of the Sun in different wavelengths to study the different layers of its atmosphere.
- STEREO A and B are two satellites which are located upstream and downstream of the Earth’s orbit around the Sun (at Lagrange points L4 and L5). Their role is to scrutinize the faces of the Sun that we do not see, and make 3D models of solar flares.
If a coronal mass ejection (read the article “Understanding the northern lights”) is detected, we will know it 8 minutes later, the time to the light to reach the satellites. It remains to know whether the trajectory of the solar plasma cloud will cross the Earth. Its direction and size can already be estimated from the STEREO satellite measurements.
A first 3-days forecast is then made: the cloud of plasma travels between 400 and 750 km/s approximately, it will take 2 to 3 days to cross the Earth.
2 to 3 days later, the cloud “pierces” the ACE satellite (Advanced Composition Explorer). This satellite, located 1.5 million kilometers in front of the Earth, on the path of the plasma clouds, is a real sentinel. The clouds that cross it will be analyzed: density, speed, magnetic field, etc. From these measurements, a more precise forecast for the next 1 to 2 hours will be calculated.
Above, a solar flare modeled by the STEREO satellites. The first view is a “top” view of the solar system. The second view is the same view, in profile, of the Earth. The large green spirals correspond to the lines of interplanetary magnetic fields emitted by Sun (the Parker spiral).
Kp index
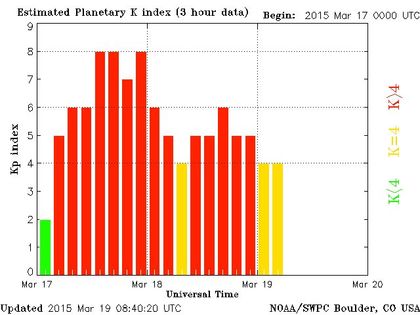
The Kp index is a world index of the Earth’s magnetic field deformation. It can take values between 1 and 9. This index was introduced by the German geophysicist Julius Bartel in 1938:
- “K”: for “Kennziffer” in German (= “code number”).
- “p”: for “planetary”. The “Kp” is therefore a world average index calculated from different observation stations. We speak of “K-Index” for a local measurement.
If a northern light occurs, then most likely the Earth’s magnetic field is strongly compressed by the solar storm that it undergoes. This is why this index is used to predict the power of the northern lights.
Consequences:
- The higher the Kp index, the more intense the aurora should be (but this is not always true, see “The limits of forecasts” below).
- But the auroral oval will move south: you must not be too north to enjoy the aurora.
- We tell of a geomagnetic storm when the Kp is greater than 5.
In northern Norway, a Kp between 2 and 3 is enough to see a northern light at the zenith. More to the south in Europe, a Kp greater than 8 will be necessary to see a red aurora (around north).
Other measures
Other measures may be given to you on apps or on specialized websites, sometimes synthesized into a single indicator called “Power of solar wind”:
- The magnetic orientation of the solar wind (Bz): this is the most important measure. It must be oriented south (negative Bz). A connection with the terrestrial magnetosphere will occur due to the north orientation of the magnetopause magnetic field (a “buffer” zone between the interplanetary magnetic field and the Earth’s magnetosphere). Following a complex path, solar wind particles will engulf themselves in the terrestrial magnetosphere and cause the northern lights (more explanations here).
- Solar wind speed: the higher it is, the greater the impact on the magnetosphere will be violent, and the more beautiful the aurora will be (expressed in km/s). Values greater than 300 km/s are necessary to observe the northern lights.
- The density of the solar wind: the richer and more dense the cloud particles, the higher the solar wind speed, the more the impact on the magnetosphere will be strong and the more beautiful the aurora will be. This measurement is expressed in protons/cm³ and it must be greater than 1 to observe the Northern Lights.
- These measurements are retrieved by the ACE satellite (see above: “Principles”) and they are considered in the forecast calculation of the Kp index. Conclusion: focus on the Kp index forecasts :-)
The limits of the forecasts
The northern lights are capricious and their predictability is not an exact science:
- Spectacular auroras are formed only through magnetic reconnection that occurs in the tail of the magnetosphere (see article “Understanding the northern lights”). As this phenomenon is still poorly understood by scientists, the aurora forecast is therefore not 100% reliable.
- The “surprise” auroras: magnetic reconnection is not necessarily related to solar storms. These just create very favorable conditions for it. In addition, magnetic reconnection can also occur without solar storm.
- The update time of your apps. Northern lights are brief phenomena. The intense phases last about ten minutes (or more during a strong storm), which is often not sufficient for our apps to be warned in time. Indeed, a few minutes are always necessary before the results of the measurement center’s calculations be published, broadcasted, then pushed on our devices.
Phases and forms of northern lights
Height of the aurora on the horizon
The shape of the aurora you will observe will depend of your position:
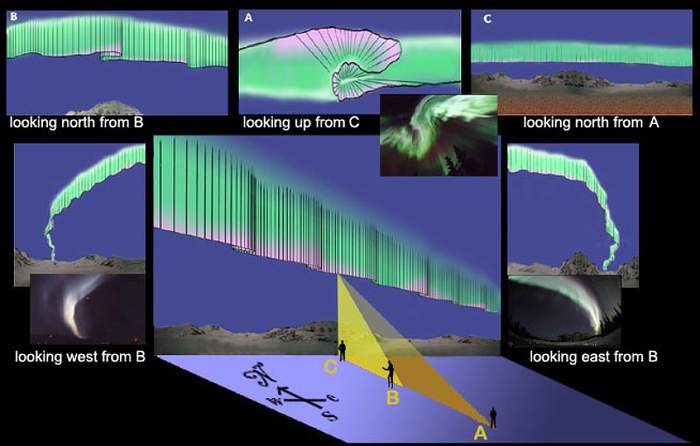
Phase 1 - The diffuse bow
Auroral activity is normal or low and the aurora is static in the sky. It is not very bright, its color is white. The aurora could be mistaken with a cloud. If you have any doubts, start a photographic exposure: if the cloud appears in green on the photo, then it’s an aurora. You have to wait, especially if the Kp forecast is good for the evening.
Phase 2 - The striped bow
A solar particles cloud begins to agitate the ionosphere. The aurora begins to dance softly across the sky, like a curtain flapping in the wind near an open window. The streaks of the aurora correspond to the Earth’s magnetic field lines. This phase is called the trigger phase.
Phase 3 - The expansion phase
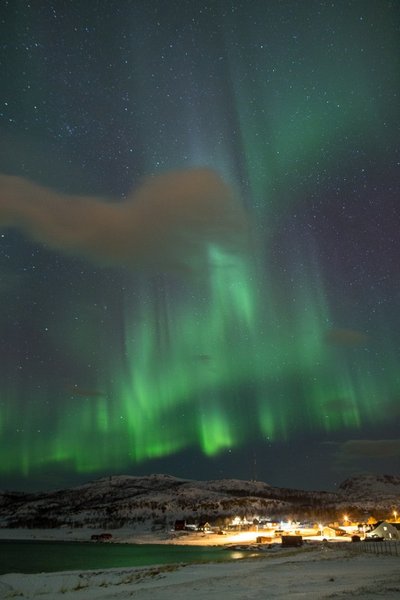
Activity is at its maximum. If the solar storm is intense, the aurora can occupy the whole sky and move at incredible speeds. There may be several expansion phases during a night. Again, don’t go to bed yet, even if the northern light seems to be extinguishing.
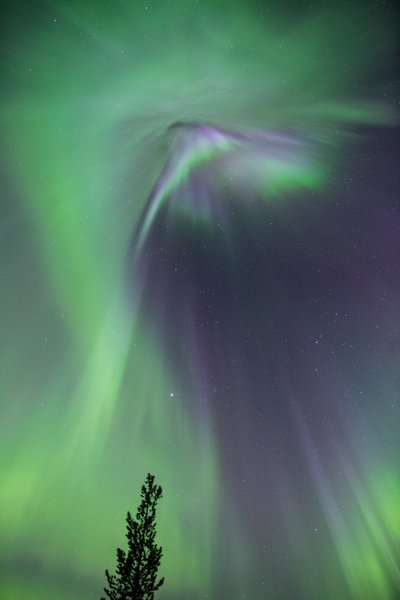
Phase 5 - The coronal aurora
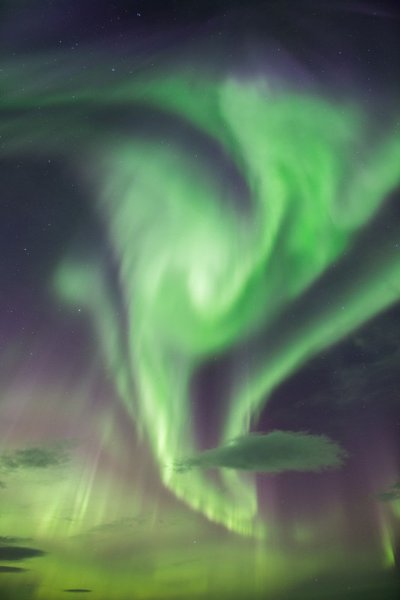
Coronal aurora is often the end of the most active phase of an intense solar storm night. It is the most spectacular phase of the aurora, the one that you will remember for a long time because its visual power is extremely intense.
The aurora is very bright. All of its streaks seem to come from one same point, it swirls around your head: it has the shape of a crown, hence its name. It occurs at the activity peak of the night, around 12 a.m.-1 a.m., when you are in the middle of the auroral oval. It requires a strong solar storm for it to occur. So it is quite rare, and above all it does not last very long (5 minutes).
If your camera is not ready, don’t try to use it: the phenomenon will be brief. So enjoy the show.
Phase 6 : the pulsating aurora
The pulsating aurora often marks the end of the night observations. This type of aurora is part of the so-called “recovery phase”. It follows a very strong solar storm, they are therefore rare. I saw them each time around 2 or 3 a.m..
Once upon a time I saw an aurora regain intensity after a pulsatile phase. The speed and intensity of the pulsations can change: sometimes very slow, sometimes extremely fast (several flashes per second).
Here is a pulsating aurora timelapse made in January 2013 in the Lofoten Islands in Norway:
In summary…
Keep the following tips in mind:
- Watch for Kp forecasts.
- 3-day Kp forecasts: they are useful for spotting future photo spots and anticipate possible trips in the country where you are.
- Forecasts for the evening: if they are good, eat a heavy meal and plan to stay outside until at least midnight. If they are not good and the sky is clear: take a regular look outside, a “surprise” aurora borealis can occur at any time (see “the limits of the forecasts”).
- Watch the weather: clear sky gaps will be necessary. Check the temperature and wind forecast to equip yourself accordingly.
- On a busy night, never go to bed before midnight. Even though the aurora seems to have died out, it can become very powerful again at any time.
Useful links
Weather and cloud cover
- Weather forecast in Norway and Sweden.
- Weather forecast in Iceland.
- Cloud cover forecast.
- Satellite animation in Northern Europe (Sat24 does not work for northern Scandinavia).
Traffic conditions
Solar weather
Useful applications for smartphones
Some useful applications for smartphones:
- iOS : Solar Monitor. Weather report : Windy (cloud cover), yr.no…
- Android : My Aurora Forecast, Space weather live. Weather forecast: Windy (cloud cover), yr.no…
